
📦 Dependencies
Before installing FNX Advanced IDS, make sure your server has the following resources installed and working correctly.
- Community Bridge
This resource is mandatory, It is used to handle framework compatibility (ESX, QBCore, Qbox), inventory systems and UI / menu / notify / target systems - screenshot-basic or screencapture
This resource is used to take player photos and generate document images You also need a MySQL resource:
- Recommended:
oxmysql - Supported:
mysql-async
- Make sure community_bridge starts BEFORE fnx-advancedids
- Make sure screenshot-basic or screencapture is working correctly, otherwise photos will not work
📦 Supported Frameworks and Inventory Systems
Inventories and frameworks are auto detected and they don’t need a manual configuration. Frameworks:- ESX
- QBCORE
- QBOX
- ox_inventory
- qb-inventory
- qs-inventory
- core_inventory
- codem-inventory
- origen_inventory
- ps-inventory
- jpr-inventory
- tgiann-inventory
Items
⚙️ Configuration
This guide will show you exactly where and how to configure the script, step by step. You do NOT need any coding experience to follow this.📁 Step 0 — FIVEMANGE IMAGE UPLOADER CONFIGURATION
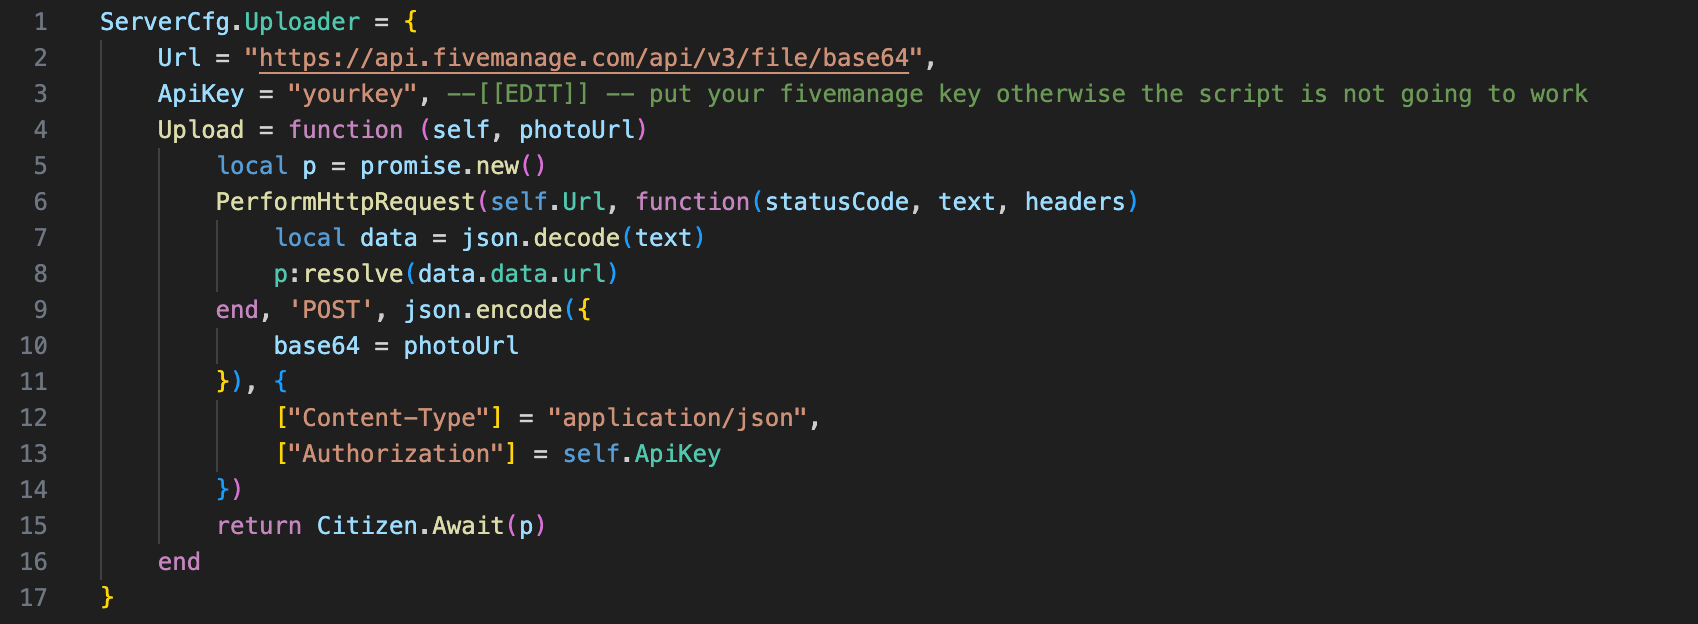
📁 Step 1 — Open the Configuration File
All main configuration is done inside this filesettings/public/client/cfg.lua
Step 2 - Create a custom card
Insidecfg.lua, scroll to
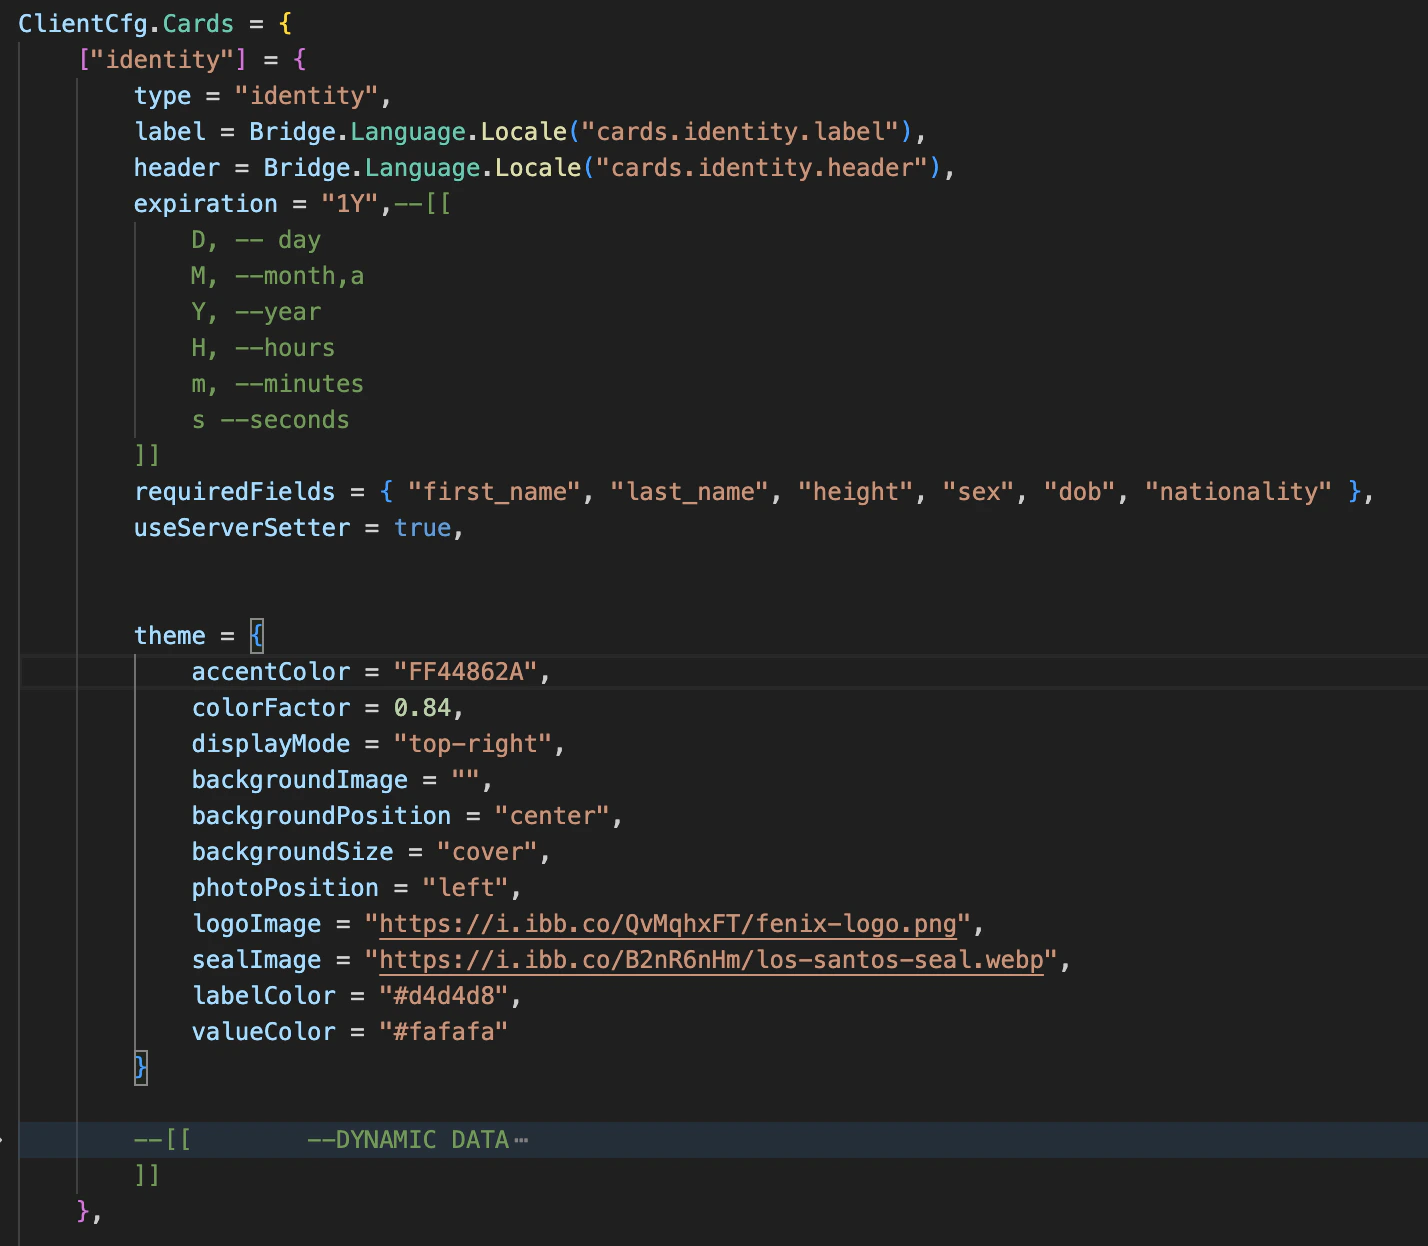

📍 Step 3 - Points configuration
Insidecfg.lua, find:
Exports Integrations
1. GiveId
This export gives a card directly to a player, It does not use a world point or NPC. It is useful when another script already knows exactly which card should be given.
target
The player’s server ID. example target = sourcecardData
A table containing the data used to create the card.cardType
The card type to create, this must match a card defined inside:"identity""weapon""drive""driver"
Example:
2. OpenCardCreation
This export opens the normal FNX Advanced IDS card creation flow for a player.
This means the player will:
- open the card creation flow
- use the internal photo system
- complete the normal document generation process
target
The player’s server ID.
cardType
The card type to create.
This must match a card defined inside:
"identity""weapon""drive""driver"
cfg
A table with creation options.
Structure
cfg.price
The price used for the creation flow.
Example:
nil if the document should be free.
cfg.takeDataFromUserInput
Controls whether the player must manually enter the document data.
Example values
- player data is taken automatically
- player must manually enter the field values
- fake IDs
- criminal documents
- custom roleplay identities
⚠️ Important
OpenCardCreation uses the FNX Advanced IDS internal camera system.
That means the player will go through the full photo capture flow before receiving the card.
Example: Driving School Integration
Below is an example integration with a driving school script. After the player receives the license through the driving school system, the script opens FNX Advanced IDS card creation to generate the physical card.Example: Illegal Menu / Fake ID
Below is an example where a criminal menu gives access to a fake identity document.- the card type is still
identity - the player enters the data manually
- this allows fake identity creation
Common Mistakes
Wrong cardType
If the card type does not exist in:
Missing fields in GiveId
If you use GiveId, make sure the fields table contains the values you want to show on the card.
This export does not automatically build the field list for you unless your internal implementation does it.
Missing image URL in GiveId
If you use GiveId, always make sure url is valid if your card requires a photo.
Using OpenCardCreation without understanding camera flow
OpenCardCreation is not an instant give function.
It opens the normal creation process, including photo capture.
Best Practice
- Use
GiveIdfor direct scripted delivery - Use
OpenCardCreationfor immersive player-facing flows\