> ## Documentation Index
> Fetch the complete documentation index at: https://docs.fenixstudios.net/llms.txt
> Use this file to discover all available pages before exploring further.
# FNX ADVANCED IDS
 Installation guide and dependencies for FNX Advanced IDS.
## 📦 Dependencies
\
Before installing **FNX Advanced IDS**, make sure your server has the following resources installed and working correctly.
1. [Community Bridge](https://github.com/TheOrderFivem/community_bridge/releases)\
This resource is **mandatory**, It is used to handle framework compatibility (ESX, QBCore, Qbox), inventory systems and UI / menu / notify / target systems
2. [screenshot-basic](https://github.com/citizenfx/screenshot-basic) or [screencapture](https://github.com/itschip/screencapture/releases/tag/v0.12.0)\
This resource is used to take player photos and generate document images You also need a MySQL resource:
* Recommended: `oxmysql`
* Supported: `mysql-async`
⚠️ **Important Notes**
* Make sure **community\_bridge starts BEFORE fnx-advancedids**
* Make sure **screenshot-basic or screencapture is working correctly**, otherwise photos will not work
***
## 📦 Supported Frameworks and Inventory Systems
Inventories and frameworks are auto detected and they don't need a manual configuration.
Frameworks:
* ESX
* QBCORE
* QBOX
Inventories:
* ox\_inventory
* qb-inventory
* qs-inventory
* core\_inventory
* codem-inventory
* origen\_inventory
* ps-inventory
* jpr-inventory
* tgiann-inventory
**⚠️ Note**
All supported inventories are compatible, however metadata handling may vary depending on the inventory version and configuration.
***
## Items
```lua ox_inventory theme={null}
['fnx_identity_card'] = {
label = 'Identity Card',
weight = 10,
stack = false,
close = true,
description = 'A personal identity document containing the holder\'s official information.',
},
['fnx_weapon_license'] = {
label = 'Weapon License',
weight = 10,
stack = false,
close = true,
description = 'An official license proving the holder is authorized to carry or own weapons.',
},
['fnx_drive_license'] = {
label = 'Driving License',
weight = 10,
stack = false,
close = true,
description = 'An official driving license containing the holder\'s vehicle authorization details.',
},
['fnx_driver_license'] = {
label = 'Driver License',
weight = 10,
stack = false,
close = true,
description = 'An official driver license used to verify the holder\'s driving permissions.',
},
```
***
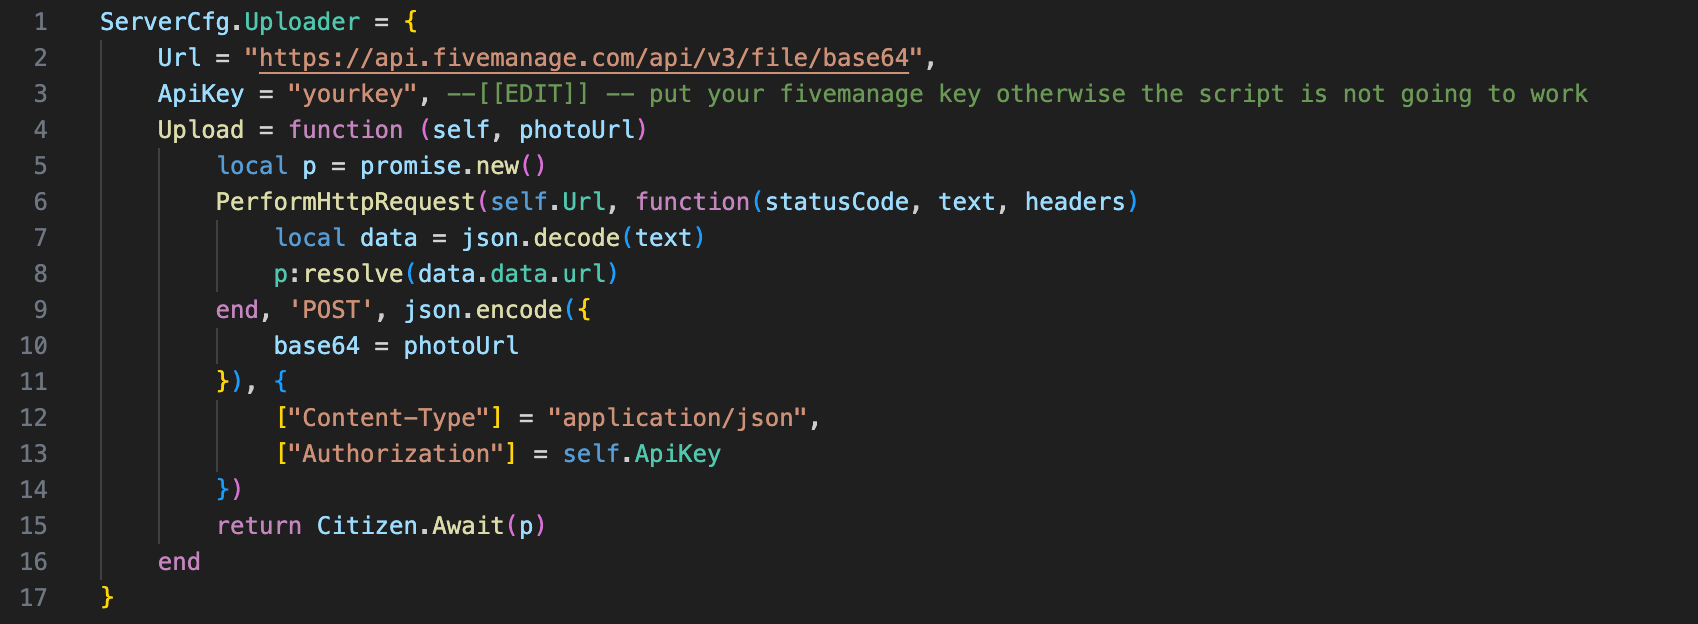
## ⚙️ Configuration
This guide will show you **exactly where and how to configure the script**, step by step. You do NOT need any coding experience to follow this.
### 📁 Step 0 — FIVEMANGE IMAGE UPLOADER CONFIGURATION
```text theme={null}
settings/public/server/cfg.lua
```
Installation guide and dependencies for FNX Advanced IDS.
## 📦 Dependencies
\
Before installing **FNX Advanced IDS**, make sure your server has the following resources installed and working correctly.
1. [Community Bridge](https://github.com/TheOrderFivem/community_bridge/releases)\
This resource is **mandatory**, It is used to handle framework compatibility (ESX, QBCore, Qbox), inventory systems and UI / menu / notify / target systems
2. [screenshot-basic](https://github.com/citizenfx/screenshot-basic) or [screencapture](https://github.com/itschip/screencapture/releases/tag/v0.12.0)\
This resource is used to take player photos and generate document images You also need a MySQL resource:
* Recommended: `oxmysql`
* Supported: `mysql-async`
⚠️ **Important Notes**
* Make sure **community\_bridge starts BEFORE fnx-advancedids**
* Make sure **screenshot-basic or screencapture is working correctly**, otherwise photos will not work
***
## 📦 Supported Frameworks and Inventory Systems
Inventories and frameworks are auto detected and they don't need a manual configuration.
Frameworks:
* ESX
* QBCORE
* QBOX
Inventories:
* ox\_inventory
* qb-inventory
* qs-inventory
* core\_inventory
* codem-inventory
* origen\_inventory
* ps-inventory
* jpr-inventory
* tgiann-inventory
**⚠️ Note**
All supported inventories are compatible, however metadata handling may vary depending on the inventory version and configuration.
***
## Items
```lua ox_inventory theme={null}
['fnx_identity_card'] = {
label = 'Identity Card',
weight = 10,
stack = false,
close = true,
description = 'A personal identity document containing the holder\'s official information.',
},
['fnx_weapon_license'] = {
label = 'Weapon License',
weight = 10,
stack = false,
close = true,
description = 'An official license proving the holder is authorized to carry or own weapons.',
},
['fnx_drive_license'] = {
label = 'Driving License',
weight = 10,
stack = false,
close = true,
description = 'An official driving license containing the holder\'s vehicle authorization details.',
},
['fnx_driver_license'] = {
label = 'Driver License',
weight = 10,
stack = false,
close = true,
description = 'An official driver license used to verify the holder\'s driving permissions.',
},
```
***
## ⚙️ Configuration
This guide will show you **exactly where and how to configure the script**, step by step. You do NOT need any coding experience to follow this.
### 📁 Step 0 — FIVEMANGE IMAGE UPLOADER CONFIGURATION
```text theme={null}
settings/public/server/cfg.lua
```
 ### 📁 Step 1 — Open the Configuration File
All main configuration is done inside this file
> settings/public/client/cfg.lua
### Step 2 - Create a custom card
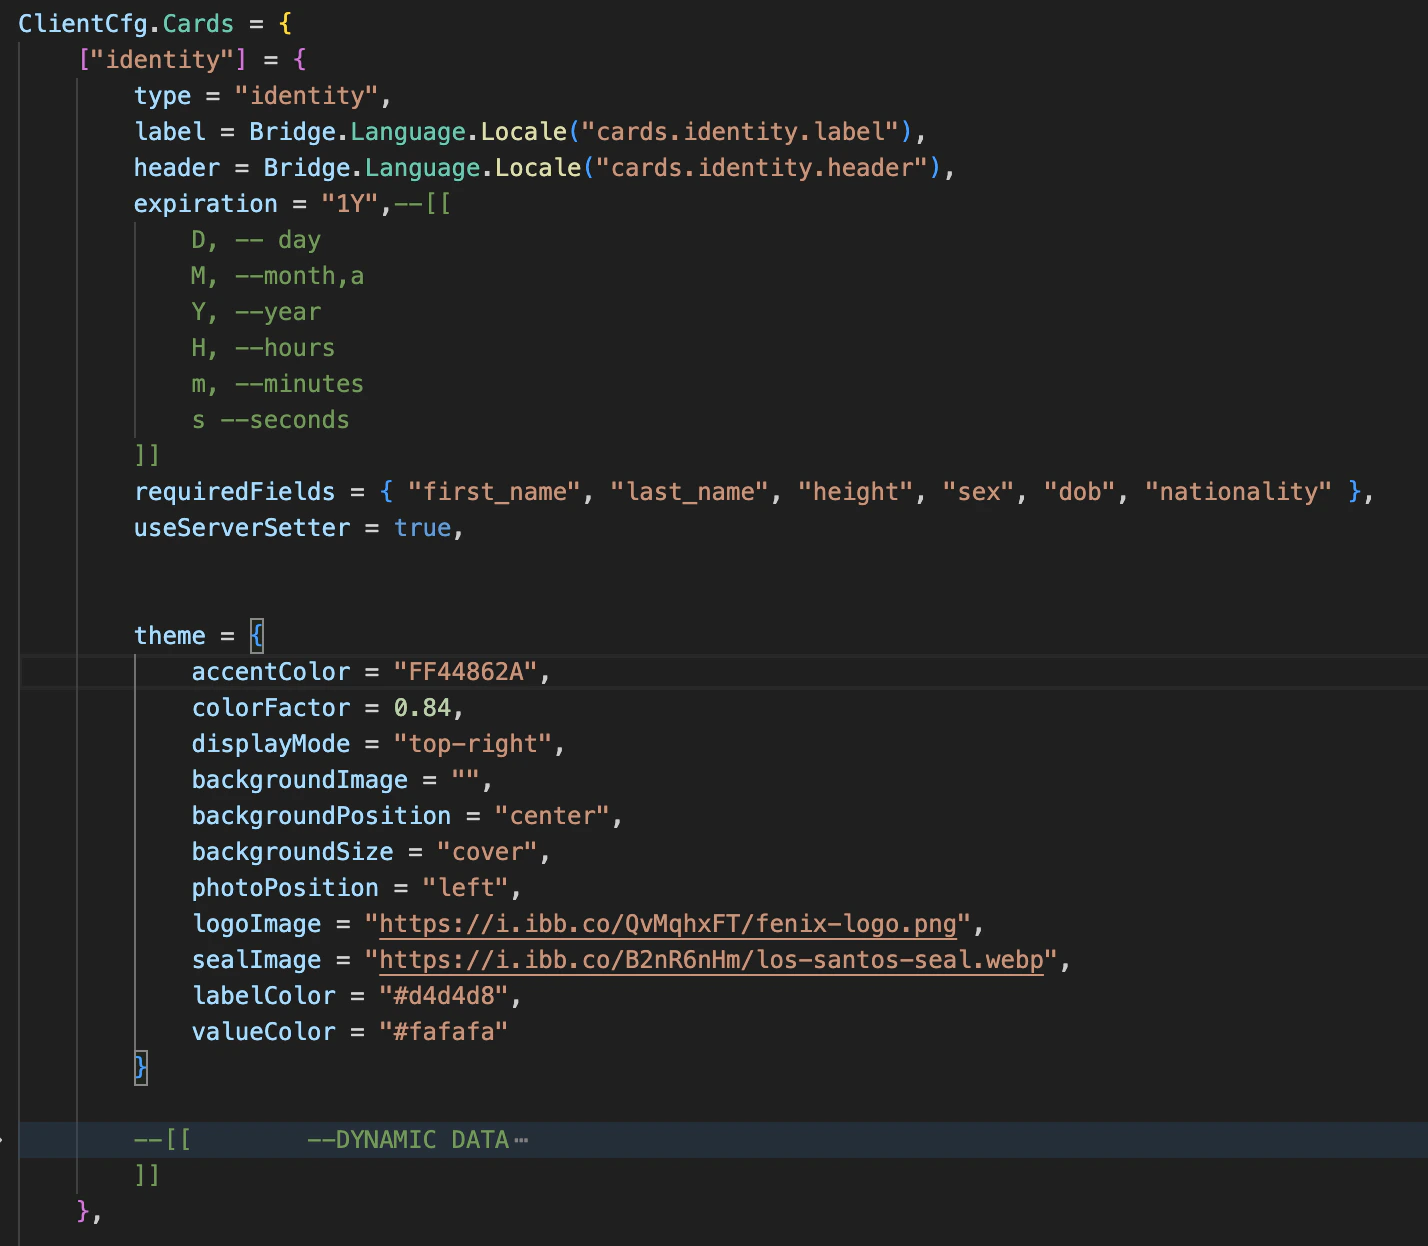
Inside `cfg.lua`, scroll to
```lua theme={null}
ClientCfg.Cards = { .. }
```
that's the default id card configuration
### 📁 Step 1 — Open the Configuration File
All main configuration is done inside this file
> settings/public/client/cfg.lua
### Step 2 - Create a custom card
Inside `cfg.lua`, scroll to
```lua theme={null}
ClientCfg.Cards = { .. }
```
that's the default id card configuration
 to create a custom card, like a MEDICARE card, follow this example
```lua twoslash theme={null}
["medicare"] = {
type = "medicare",
label = "Medicare Card",
header = "LOS SANTOS MEDICARE",
expiration = "1Y",--[[
D, -- day
M, --month
Y, --year
H, --hours
m, --minutes
s --seconds
]]
requiredFields = { "first_name", "last_name", "height", "sex", "dob", "nationality" },
useServerSetter = false,
theme = {
accentColor = "FF2A8C82",
colorFactor = 0.84,
displayMode = "top-right",
backgroundImage = "",
backgroundPosition = "center",
backgroundSize = "cover",
photoPosition = "left",
logoImage = "https://i.ibb.co/QvMqhxFT/fenix-logo.png",
sealImage = "https://i.ibb.co/B2nR6nHm/los-santos-seal.webp",
labelColor = "#d4d4d8",
valueColor = "#fafafa"
}
--[[ --DYNAMIC DATA
fields = {
{
key = "", --?
label = "",
value = ""
}
},
created_at = 1735689600,
expires_at = 1767225600,
id = -1,
image_url = "https://dummyimage.com/512x512/1f2937/f9fafb.png&text=MARIO+ROSSI",
]]
},
```
the index, is the card name
```lua theme={null}
["medicare"] =
```
type is supposed to be the same as the index
```lua theme={null}
type = "medicare",
```
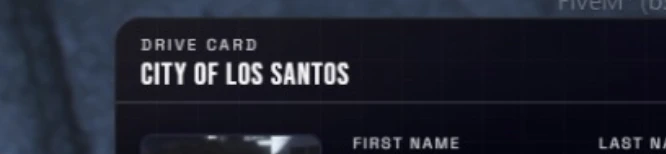
The label and header fields are the ones displayed on top-left of the card, see the picture as reference
```lua theme={null}
label = "Drive card",
header = "City of los santos",
```
to create a custom card, like a MEDICARE card, follow this example
```lua twoslash theme={null}
["medicare"] = {
type = "medicare",
label = "Medicare Card",
header = "LOS SANTOS MEDICARE",
expiration = "1Y",--[[
D, -- day
M, --month
Y, --year
H, --hours
m, --minutes
s --seconds
]]
requiredFields = { "first_name", "last_name", "height", "sex", "dob", "nationality" },
useServerSetter = false,
theme = {
accentColor = "FF2A8C82",
colorFactor = 0.84,
displayMode = "top-right",
backgroundImage = "",
backgroundPosition = "center",
backgroundSize = "cover",
photoPosition = "left",
logoImage = "https://i.ibb.co/QvMqhxFT/fenix-logo.png",
sealImage = "https://i.ibb.co/B2nR6nHm/los-santos-seal.webp",
labelColor = "#d4d4d8",
valueColor = "#fafafa"
}
--[[ --DYNAMIC DATA
fields = {
{
key = "", --?
label = "",
value = ""
}
},
created_at = 1735689600,
expires_at = 1767225600,
id = -1,
image_url = "https://dummyimage.com/512x512/1f2937/f9fafb.png&text=MARIO+ROSSI",
]]
},
```
the index, is the card name
```lua theme={null}
["medicare"] =
```
type is supposed to be the same as the index
```lua theme={null}
type = "medicare",
```
The label and header fields are the ones displayed on top-left of the card, see the picture as reference
```lua theme={null}
label = "Drive card",
header = "City of los santos",
```
 This requiredFields contains the fields that you want to show up on the card, you can also create custom fields and much more, each card can be unique in the use.
```lua twoslash theme={null}
requiredFields = { "first_name", "last_name", "height", "sex", "dob", "nationality" },
```
This option, set the as a license the item name on the player data.
```lua theme={null}
useServerSetter = false,
```
\*\* no more is explained because is mainly styling job. we hape you enjoyed your custom card creation.
### 📍 Step 3 - Points configuration
Inside `cfg.lua`, find:
```lua theme={null}
ClientCfg.Points = { ... }
```
These are the locations where players can obtain documents, you can add new points, remove or change them.
```lua theme={null}
takeDataFromUserInput = false,
```
This config, allow the player to set manually the data displayed on the type of license that's going to obtain, this feature is active on the fake id point, be default for driving licenses, id card and firearm license is set on false, because we get the data automatically.
```lua theme={null}
type = "drive",
```
it's the card previously created that's going to be given trought this point.
```lua theme={null}
price = {
money = 500,
bank = 500
}
```
in any point you can also change price, remove it bank / cash or other accounts like black\_money
```lua theme={null}
requiredItems = {
["water"] = 10,
},
```
in any point, you can set one or more required items to obtain a card, this can be useful for the fake id creation point, it works in this way
```lua theme={null}
requiredServerLicense = {
["drive"] = true,
},
```
in any point, you can set that to get a determinate item you need to have another license saved on your framework, for example, on the sample config above, to get the access to this license (we will say thats the flight permit) you need to mandatory have the "drive" license saved on your core (for example, in esx\_license ) that's the car driving license.
```lua theme={null}
allowDuplicate = true,
```
it means that on this point, the card can be taken as many times the players wants to
***
## Exports Integrations
### 1. `GiveId`
This export gives a card directly to a player, It does **not** use a world point or NPC. \
It is useful when another script already knows exactly which card should be given.
```lua theme={null}
exports["fnx-advancedids"]:GiveId(target, cardType, cardData)
```
#### target
The player's server ID. example target = source
#### cardData
A table containing the data used to create the card.
```text theme={null}
{
price = { -- price to set when giving a card
["money"] = 500,
--["cash"] = 100,
--["black_money"] = 312,
["bank"] = 500,
--["dirty_money"] = 15000
},-- or nil
fields = {
{
label = "Label", -- example "FIRST NAME"
value = "Value", -- example "Jonh"
side = "front" -- front or back
},
},
url = "image url" -- The image URL used for the player's photo.
}
```
#### cardType
The card type to create, this must match a card defined inside:
```text theme={null}
settings/public/client/cfg.lua
```
inside:
```text theme={null}
ClientCfg.Cards = {
```
Example valid values:
* `"identity"`
* `"weapon"`
* `"drive"`
* `"driver"`
#### Example:
```lua theme={null}
exports["fnx-advancedids"]:GiveId(source, "identity", {
price = {
["money"] = 500,
--["cash"] = 100,
--["black_money"] = 312,
["bank"] = 500,
--["dirty_money"] = 15000
},-- or nil
fields = {
{
label = "First Name",
value = "John",
side = "front"
},
{
label = "Last Name",
value = "Smith",
side = "front"
},
{
label = "DOB",
value = "01/01/2000",
side = "front"
}
},
url = "https://your-image-url.com/image.png"
})
```
### 2. `OpenCardCreation`
This export opens the normal FNX Advanced IDS card creation flow for a player.
This means the player will:
* open the card creation flow
* use the internal photo system
* complete the normal document generation process
This is the best option when you want to reuse the script's built-in creation system.
```lua theme={null}
exports["fnx-advancedids"]:OpenCardCreation(target, cardType, cfg)
```
### `target`
The player's server ID.
### `cardType`
The card type to create.
This must match a card defined inside:
```lua theme={null}
settings/public/client/cfg.lua
```
inside:
```lua theme={null}
ClientCfg.Cards = { .. }
```
Example:
* `"identity"`
* `"weapon"`
* `"drive"`
* `"driver"`
### `cfg`
A table with creation options.
## Structure
```lua theme={null}
{
price = { ... },
takeDataFromUserInput = false
}
```
## `cfg.price`
The price used for the creation flow.
Example:
```lua theme={null}
price = {
["money"] = 500,
--["cash"] = 100,
--["black_money"] = 312,
["bank"] = 500,
--["dirty_money"] = 15000
},-- or nil
```
Use `nil` if the document should be free.
## `cfg.takeDataFromUserInput`
Controls whether the player must manually enter the document data.
### Example values
```text theme={null}
takeDataFromUserInput = false
```
* player data is taken automatically
```text theme={null}
takeDataFromUserInput = true
```
* player must manually enter the field values
This is especially useful for:
* fake IDs
* criminal documents
* custom roleplay identities
***
# ⚠️ Important
`OpenCardCreation` uses the FNX Advanced IDS internal camera system.
That means the player will go through the full photo capture flow before receiving the card.
***
# Example: Driving School Integration
Below is an example integration with a driving school script.
After the player receives the license through the driving school system, the script opens FNX Advanced IDS card creation to generate the physical card.
```lua theme={null}
RegisterNetEvent('esx_dmvschool:addLicense')
AddEventHandler('esx_dmvschool:addLicense', function(type)
local _source = source
TriggerEvent('esx_license:addLicense', _source, type, function()
TriggerEvent('esx_license:getLicenses', _source, function(licenses)
TriggerClientEvent('esx_dmvschool:loadLicenses', _source, licenses)
end)
end)
exports["fnx-advancedids"]:OpenCardCreation(_source, "drive", {
price = nil,
takeDataFromUserInput = false,
})
end)
```
***
# Example: Illegal Menu / Fake ID
Below is an example where a criminal menu gives access to a fake identity document.
```lua theme={null}
RegisterNetEvent('illegalMenu:giveFakeId')
AddEventHandler('illegalMenu:giveFakeId', function(target)
exports["fnx-advancedids"]:OpenCardCreation(target, "identity", {
price = nil,
takeDataFromUserInput = true,
})
end)
```
In this case:
* the card type is still `identity`
* the player enters the data manually
* this allows fake identity creation
***
# Common Mistakes
## Wrong `cardType`
If the card type does not exist in:
```lua theme={null}
ClientCfg.Cards
```
the export will not work correctly.
Always use a valid card type.
***
## Missing fields in `GiveId`
If you use `GiveId`, make sure the `fields` table contains the values you want to show on the card.
This export does not automatically build the field list for you unless your internal implementation does it.
***
## Missing image URL in `GiveId`
If you use `GiveId`, always make sure `url` is valid if your card requires a photo.
***
## Using `OpenCardCreation` without understanding camera flow
`OpenCardCreation` is not an instant give function.
It opens the normal creation process, including photo capture.
***
# Best Practice
* Use `GiveId` for direct scripted delivery
* Use `OpenCardCreation` for immersive player-facing flows\\
***
# Quick Reference
## Give a card directly
```lua theme={null}
exports["fnx-advancedids"]:GiveId(target, cardType, cardData)
```
## Open normal creation flow
```lua theme={null}
exports["fnx-advancedids"]:OpenCardCreation(target, cardType, cfg)
```
This requiredFields contains the fields that you want to show up on the card, you can also create custom fields and much more, each card can be unique in the use.
```lua twoslash theme={null}
requiredFields = { "first_name", "last_name", "height", "sex", "dob", "nationality" },
```
This option, set the as a license the item name on the player data.
```lua theme={null}
useServerSetter = false,
```
\*\* no more is explained because is mainly styling job. we hape you enjoyed your custom card creation.
### 📍 Step 3 - Points configuration
Inside `cfg.lua`, find:
```lua theme={null}
ClientCfg.Points = { ... }
```
These are the locations where players can obtain documents, you can add new points, remove or change them.
```lua theme={null}
takeDataFromUserInput = false,
```
This config, allow the player to set manually the data displayed on the type of license that's going to obtain, this feature is active on the fake id point, be default for driving licenses, id card and firearm license is set on false, because we get the data automatically.
```lua theme={null}
type = "drive",
```
it's the card previously created that's going to be given trought this point.
```lua theme={null}
price = {
money = 500,
bank = 500
}
```
in any point you can also change price, remove it bank / cash or other accounts like black\_money
```lua theme={null}
requiredItems = {
["water"] = 10,
},
```
in any point, you can set one or more required items to obtain a card, this can be useful for the fake id creation point, it works in this way
```lua theme={null}
requiredServerLicense = {
["drive"] = true,
},
```
in any point, you can set that to get a determinate item you need to have another license saved on your framework, for example, on the sample config above, to get the access to this license (we will say thats the flight permit) you need to mandatory have the "drive" license saved on your core (for example, in esx\_license ) that's the car driving license.
```lua theme={null}
allowDuplicate = true,
```
it means that on this point, the card can be taken as many times the players wants to
***
## Exports Integrations
### 1. `GiveId`
This export gives a card directly to a player, It does **not** use a world point or NPC. \
It is useful when another script already knows exactly which card should be given.
```lua theme={null}
exports["fnx-advancedids"]:GiveId(target, cardType, cardData)
```
#### target
The player's server ID. example target = source
#### cardData
A table containing the data used to create the card.
```text theme={null}
{
price = { -- price to set when giving a card
["money"] = 500,
--["cash"] = 100,
--["black_money"] = 312,
["bank"] = 500,
--["dirty_money"] = 15000
},-- or nil
fields = {
{
label = "Label", -- example "FIRST NAME"
value = "Value", -- example "Jonh"
side = "front" -- front or back
},
},
url = "image url" -- The image URL used for the player's photo.
}
```
#### cardType
The card type to create, this must match a card defined inside:
```text theme={null}
settings/public/client/cfg.lua
```
inside:
```text theme={null}
ClientCfg.Cards = {
```
Example valid values:
* `"identity"`
* `"weapon"`
* `"drive"`
* `"driver"`
#### Example:
```lua theme={null}
exports["fnx-advancedids"]:GiveId(source, "identity", {
price = {
["money"] = 500,
--["cash"] = 100,
--["black_money"] = 312,
["bank"] = 500,
--["dirty_money"] = 15000
},-- or nil
fields = {
{
label = "First Name",
value = "John",
side = "front"
},
{
label = "Last Name",
value = "Smith",
side = "front"
},
{
label = "DOB",
value = "01/01/2000",
side = "front"
}
},
url = "https://your-image-url.com/image.png"
})
```
### 2. `OpenCardCreation`
This export opens the normal FNX Advanced IDS card creation flow for a player.
This means the player will:
* open the card creation flow
* use the internal photo system
* complete the normal document generation process
This is the best option when you want to reuse the script's built-in creation system.
```lua theme={null}
exports["fnx-advancedids"]:OpenCardCreation(target, cardType, cfg)
```
### `target`
The player's server ID.
### `cardType`
The card type to create.
This must match a card defined inside:
```lua theme={null}
settings/public/client/cfg.lua
```
inside:
```lua theme={null}
ClientCfg.Cards = { .. }
```
Example:
* `"identity"`
* `"weapon"`
* `"drive"`
* `"driver"`
### `cfg`
A table with creation options.
## Structure
```lua theme={null}
{
price = { ... },
takeDataFromUserInput = false
}
```
## `cfg.price`
The price used for the creation flow.
Example:
```lua theme={null}
price = {
["money"] = 500,
--["cash"] = 100,
--["black_money"] = 312,
["bank"] = 500,
--["dirty_money"] = 15000
},-- or nil
```
Use `nil` if the document should be free.
## `cfg.takeDataFromUserInput`
Controls whether the player must manually enter the document data.
### Example values
```text theme={null}
takeDataFromUserInput = false
```
* player data is taken automatically
```text theme={null}
takeDataFromUserInput = true
```
* player must manually enter the field values
This is especially useful for:
* fake IDs
* criminal documents
* custom roleplay identities
***
# ⚠️ Important
`OpenCardCreation` uses the FNX Advanced IDS internal camera system.
That means the player will go through the full photo capture flow before receiving the card.
***
# Example: Driving School Integration
Below is an example integration with a driving school script.
After the player receives the license through the driving school system, the script opens FNX Advanced IDS card creation to generate the physical card.
```lua theme={null}
RegisterNetEvent('esx_dmvschool:addLicense')
AddEventHandler('esx_dmvschool:addLicense', function(type)
local _source = source
TriggerEvent('esx_license:addLicense', _source, type, function()
TriggerEvent('esx_license:getLicenses', _source, function(licenses)
TriggerClientEvent('esx_dmvschool:loadLicenses', _source, licenses)
end)
end)
exports["fnx-advancedids"]:OpenCardCreation(_source, "drive", {
price = nil,
takeDataFromUserInput = false,
})
end)
```
***
# Example: Illegal Menu / Fake ID
Below is an example where a criminal menu gives access to a fake identity document.
```lua theme={null}
RegisterNetEvent('illegalMenu:giveFakeId')
AddEventHandler('illegalMenu:giveFakeId', function(target)
exports["fnx-advancedids"]:OpenCardCreation(target, "identity", {
price = nil,
takeDataFromUserInput = true,
})
end)
```
In this case:
* the card type is still `identity`
* the player enters the data manually
* this allows fake identity creation
***
# Common Mistakes
## Wrong `cardType`
If the card type does not exist in:
```lua theme={null}
ClientCfg.Cards
```
the export will not work correctly.
Always use a valid card type.
***
## Missing fields in `GiveId`
If you use `GiveId`, make sure the `fields` table contains the values you want to show on the card.
This export does not automatically build the field list for you unless your internal implementation does it.
***
## Missing image URL in `GiveId`
If you use `GiveId`, always make sure `url` is valid if your card requires a photo.
***
## Using `OpenCardCreation` without understanding camera flow
`OpenCardCreation` is not an instant give function.
It opens the normal creation process, including photo capture.
***
# Best Practice
* Use `GiveId` for direct scripted delivery
* Use `OpenCardCreation` for immersive player-facing flows\\
***
# Quick Reference
## Give a card directly
```lua theme={null}
exports["fnx-advancedids"]:GiveId(target, cardType, cardData)
```
## Open normal creation flow
```lua theme={null}
exports["fnx-advancedids"]:OpenCardCreation(target, cardType, cfg)
```